Landscape Heightmap 16k Free Download

General / 19 September 2023


Landscape Heightmap 16k – Free Download

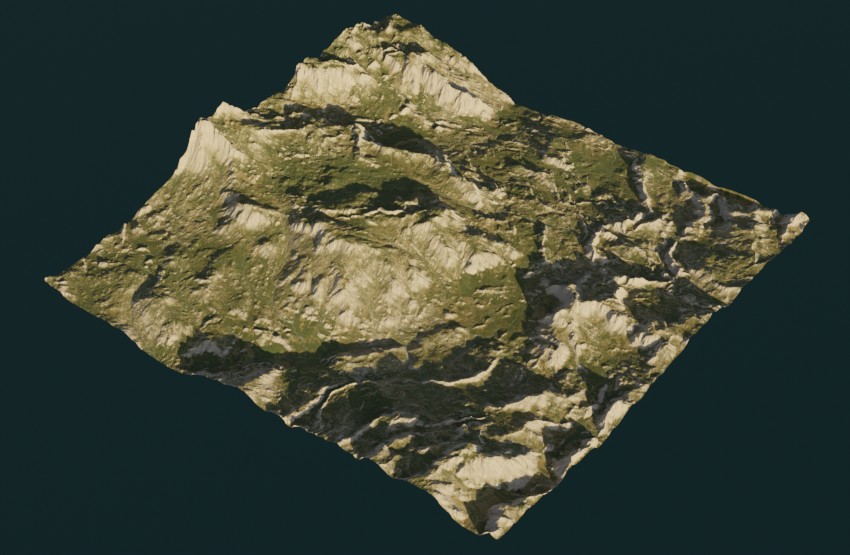
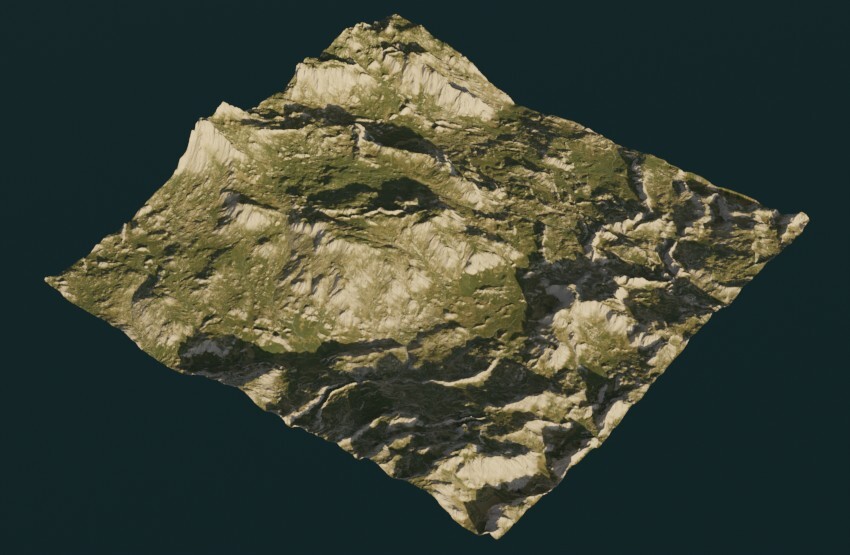
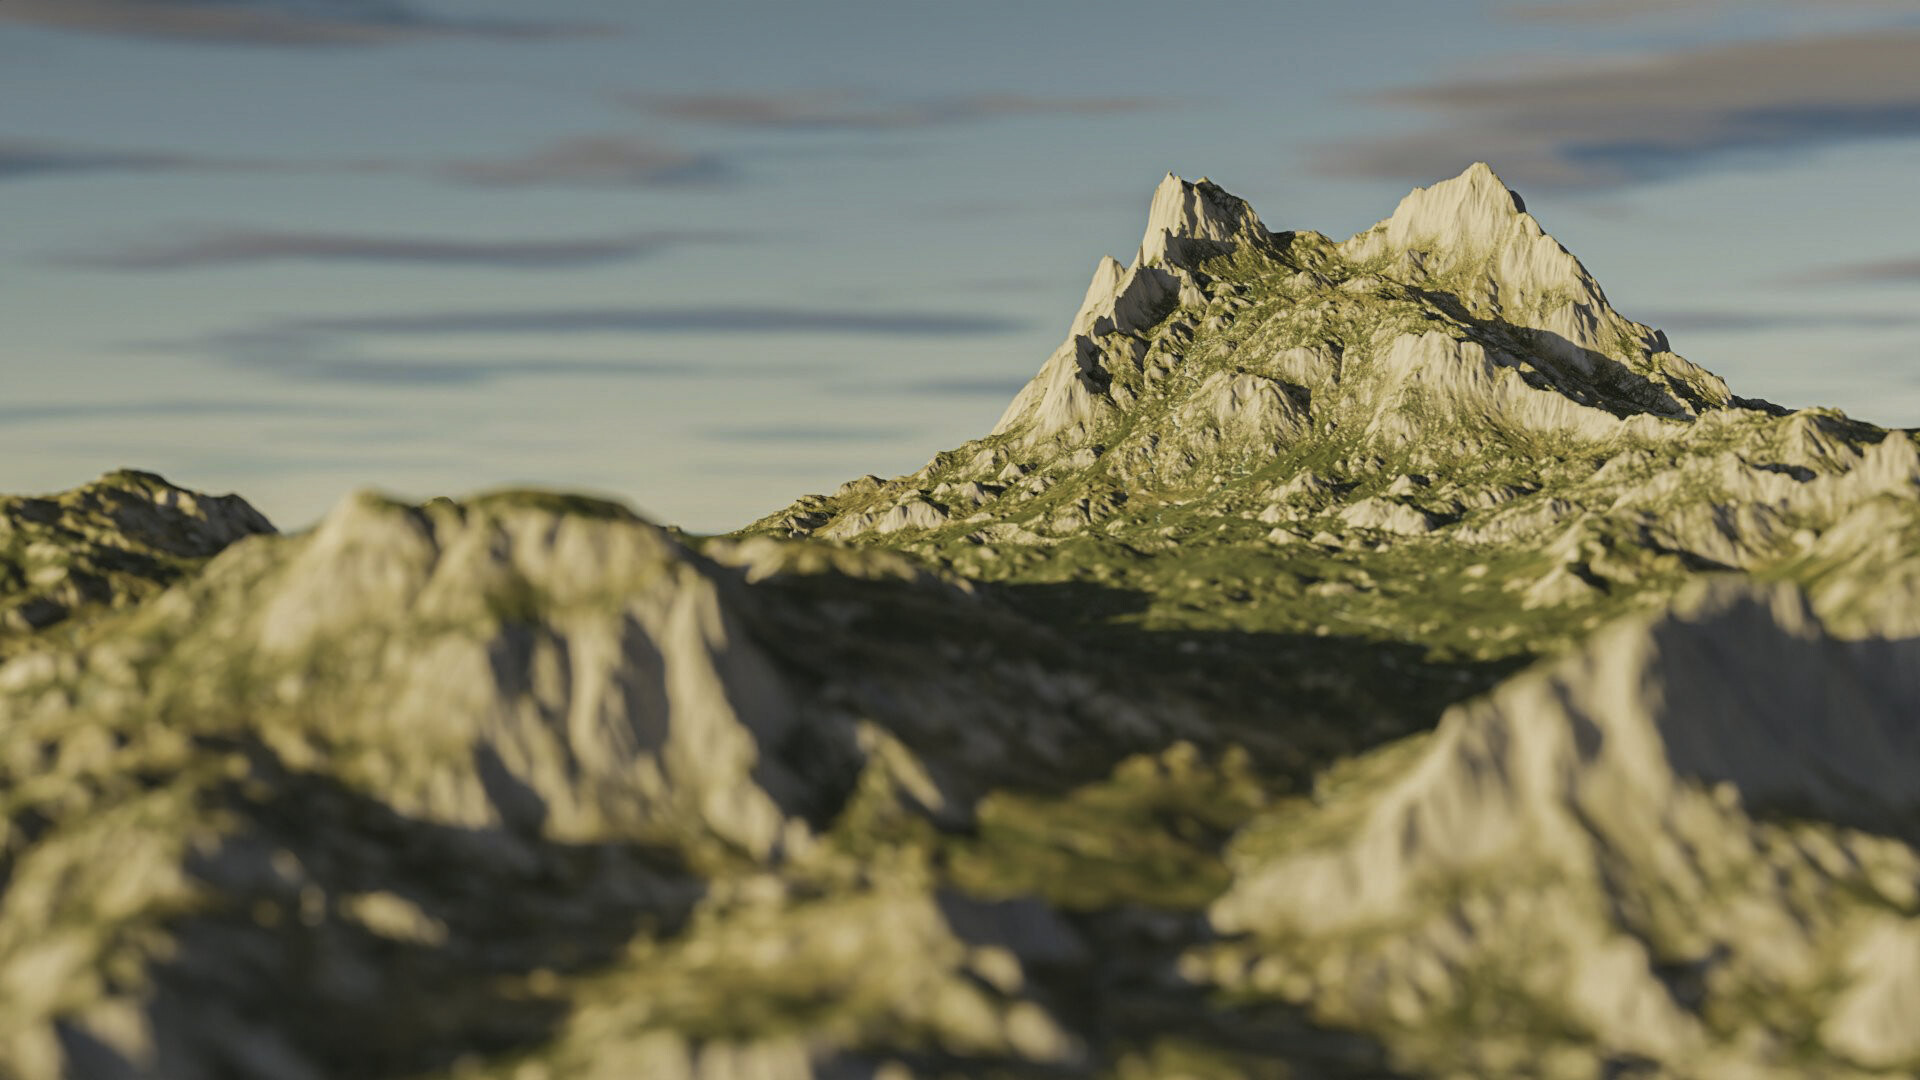
Please click the button below for a free download of a 16k, rocky terrain, landscape heightmap in EXR file format. I have not been able to find barely any landscape heightmaps free to download of this resolution, so I have created this one from scratch and I am happy to offer for free download under a creative commons CC BY4 license.

Please note this heightmap is huge and the file itself is 1GB and the Diffuse is 3GB. If you do use this heightmap – I would recommend a graphics card that has at least 10GB ram and to use a fast M.2 SSD. You may also encounter performance issues due to the demand this file will have on PC resources.

This heightmap will not work in Unreal Engine unless its resolution is reduced as UE only accepts texture resolutions up to 8k. This file will work in programs such as Blender or Maya.

File Format: EXR

Resolution: 16384 x 16384

Files: Heightmap and Diffuse

This work is licensed under a Creative Commons Attribution 4.0 International License. Attribution required and Commercial usage allowed. Please attribute Chris J Mitchell – Motion Forge Pictures – or just – Chris J Mitchell.

For a selection of other free heightmaps please see the download page here. For updates on new heightmaps added to the website, news and updates, tutorials and free or paid for resources please sign up to the newsletter

The post Landscape Heightmap 16k Free Download appeared first on Motion Forge Pictures.

Report

Unreal Engine Blueprint – Can I break or cancel a delay node?

General / 10 September 2023

Can I break or cancel a delay node?

Technically you can’t cancel or break a delay node unless you’re using C++. But there is a way to re-route the delay node, so it triggers different actions. This requires the use of switches, bools and other nodes that in all intent and purposes will break the delay node.

Below is an example of a Blueprint I created that didn’t work as required, for the delay node needed to be canceled in certain scenarios, but after some additional logic I got it working as required.

Auto Light – On or Off: Initial Blueprint.

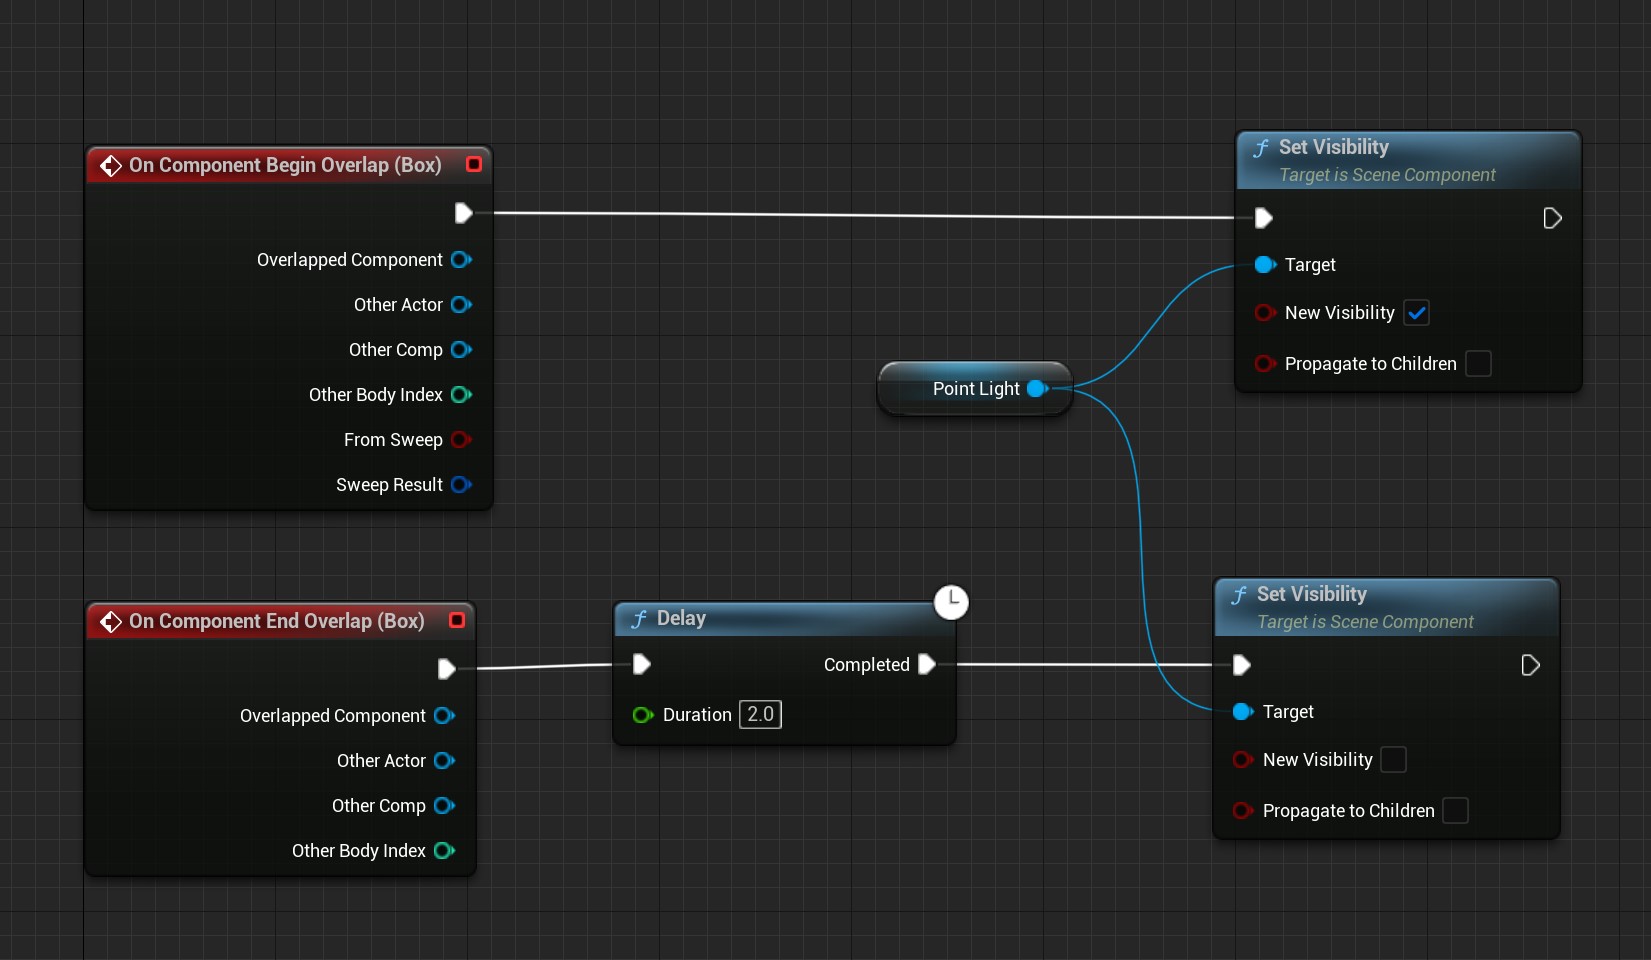
I’d created a simple ‘auto – on or off’ blueprint where if the player entered the (begin overlap) collision box it turned on a light. The light would then be triggered to turn off when leaving the (end overlap) collision box. To make this a little more realistic I added a delay node to stop the light turning off immediately. See code below:

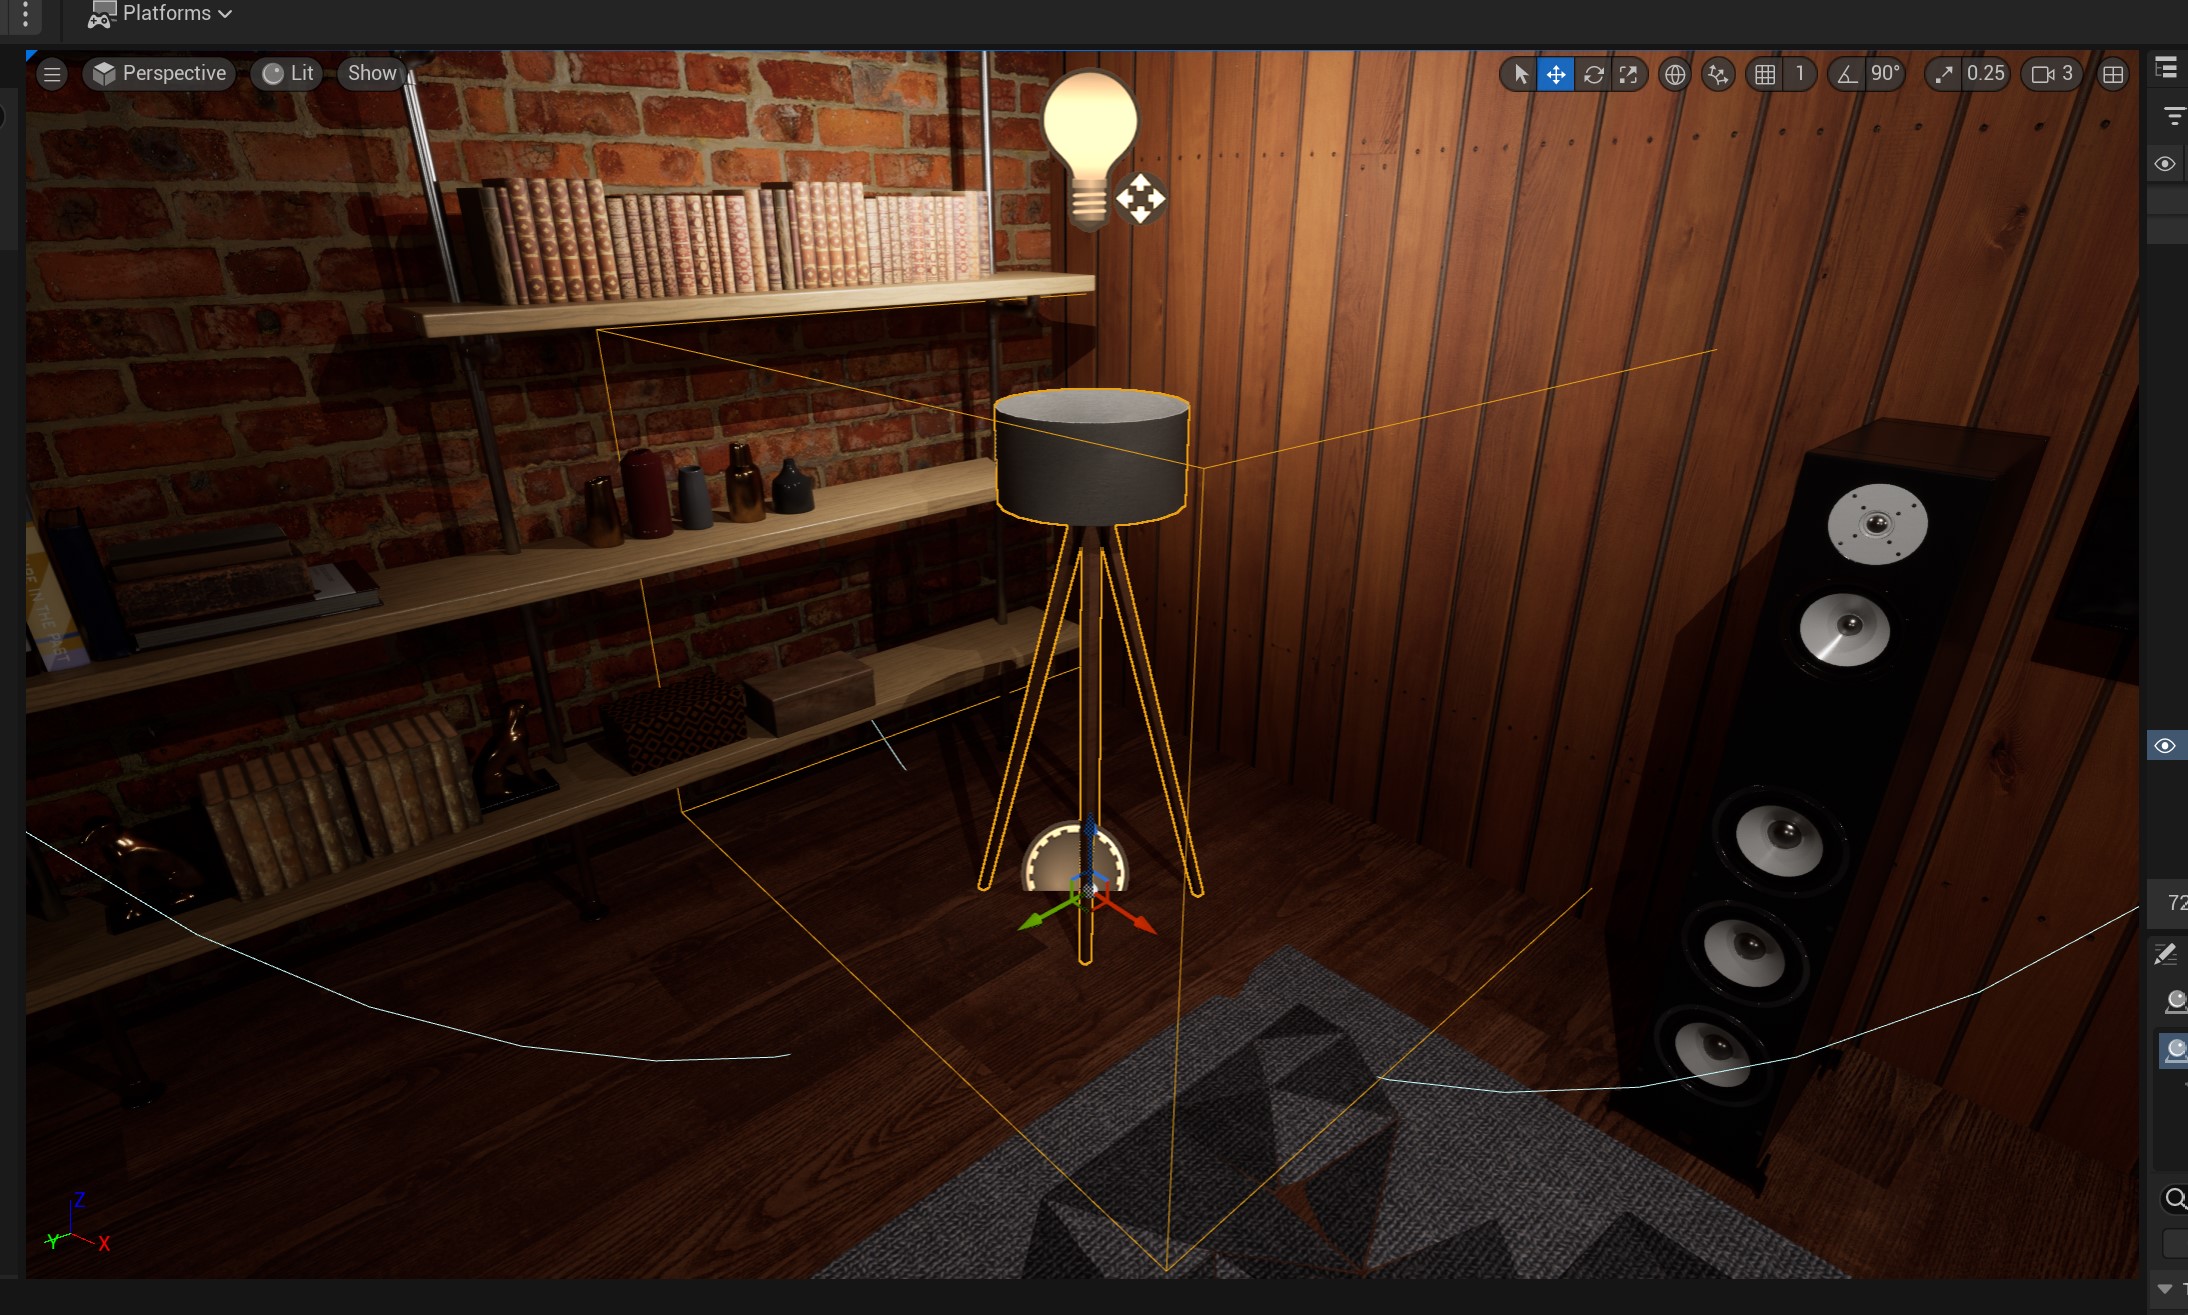
The components added for this are just a point light, collision box and a static mesh for the lamp shade.

The problem I encountered was if I quickly re-entered the collision box before the delay was executed, the light would turn off with the player character still in the collision box. Hence leaving the logic functioning incorrectly.

The simple solution would be to just cancel the delay, but there is no way to do that in Blueprints.


Auto Light On or Off: Updated Blueprint with more advanced Logic:

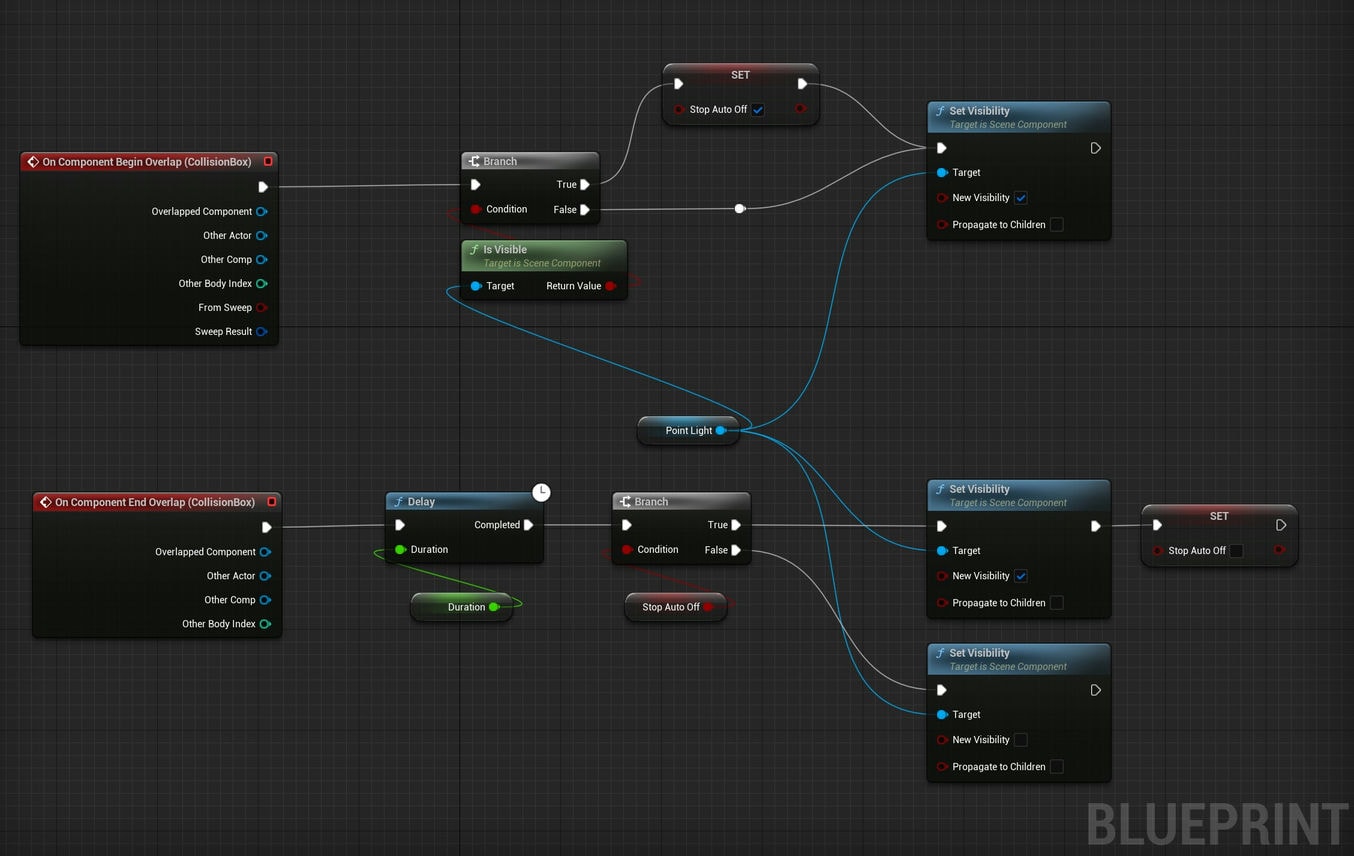
So, I created a switch and branch to circumnavigate the delay if the player re-entered when the delay was still counting down and if the light was still on.

To do this I added a switch (Boolean variable) where if the player re-entered the collision box whilst the delay node was still running, this would flick a switch to re-route the delay node to keep the light on, as opposed to turn the light off. See the final version and a detailed outline of the code below:

Logic: The > arrow represents the flow of the nodes in the graph above.

  1. Player enters the (Begin Overlap) collision box > Triggers the Branch.
    1. Branch Condition: I added the Is Visiblenode > The target of this is the point light and this checks if it’s Visible.
      1. I created a Boolean Variable and called it: Stop Auto Off
    2. So, if Light is Visible > Then the Branch = True > Set Boolean Switch (Stop Auto Off) to True (as its set to False initially)
    3. If not visible > Then Branch = False > Set Visibility to Visible (tick the box). 
  2. Player leaves (End Overlap) collision box > Triggers the Delay.
    1. This Triggers another Branch.
    2. Boolean Condition = True or False
    3. If True > Set Visibility to On and Set Stop Auto Off to false (by default leave the box unticked in the Boolean node).
    4. If False > Set Visibility to Off.

In summary:

When the player enters the collision box it checks if the light is on (visible) if it is on then flick a Boolean switch and this will simply change the action for when the player leaves the collision box. Hence, either trigger the delay to turn the light off when the player leaves or if the player remains under the light then keep the light on!

Key Notes:

This is one way to re-route a delay node and you may have to tweak or amend the logic for your purposes, but this should give you a way forward. If you have any comments or suggestions please do say.
Report

Unreal Engine Blueprint – Cycle Through an Array

General / 15 August 2023

Unreal Engine Blueprint – Cycle Through an Array

This tutorial will show you how to cycle through an array. It will cycle through a selection of different colors to do this, but it can be used with other functions as well and not just changing colors.

Components:

  1. Right click in the required folder and create an actor blueprint.
  2. In components panel add:
    1. A Static mesh and in its details panel add the required mesh e.g. Lamp shade or light fitting.
    2. Add a collision box and resize to the required size (make sure the players character can fit into the box).
    3. Add a point light and position where required.

Event Graph:

  1. To replace the Event Interact Interface (red node) in the image below see NOTES at bottom of page.
  2. Add a Branch.
  3. Drag of execution pin and search for Set Light Color
    1. This will be added with the point light (if not then drag point light from components and attached to set light color).
  4. In variables panel:
    1. Add a new variable – then change type from Boolean to Color Actor
    2. Right click on Color Actor to make it an array.
      1. In its detail panel (on the right hand side)
      2. Add 3 Array Elements.
      3. Change the color of each.
      4. You now have man array of 3 colors.
    3. Add an Integer and name it Current Index.
    4. Drag these both into the graph.
  5. Drag off the Color array node and search for Get (a copy).
    1. Plug in the Current index into the lower socket of Get (a copy).
  6. Drag off Get (a copy) and plug into New Light Color of the Set Light Color node.

Finishing off the Graph:

  1. Drag the Current Index node into the graph again.
    1. Select the Set option.
    2. Drag off Current Index socket.
    3. Add a + node.
    4. Add 1 into the bottom box.
    5. Drag of the top left node and search for and add the Current Index node again.
  2. Now you will be able to cycle through the Array index by adding 1 to its element each time you press the interact key (E.g. E key).
    1. This will need to reset to 0 though.
    2. Follow the image below to add the rest of the nodes.
  3. To add the LENGTH node
    1. Drag off from the Color array node (once you’ve added it)
    2. Search for LENGTH.
    3. This simply gets the number of elements in the array (3 in this example).

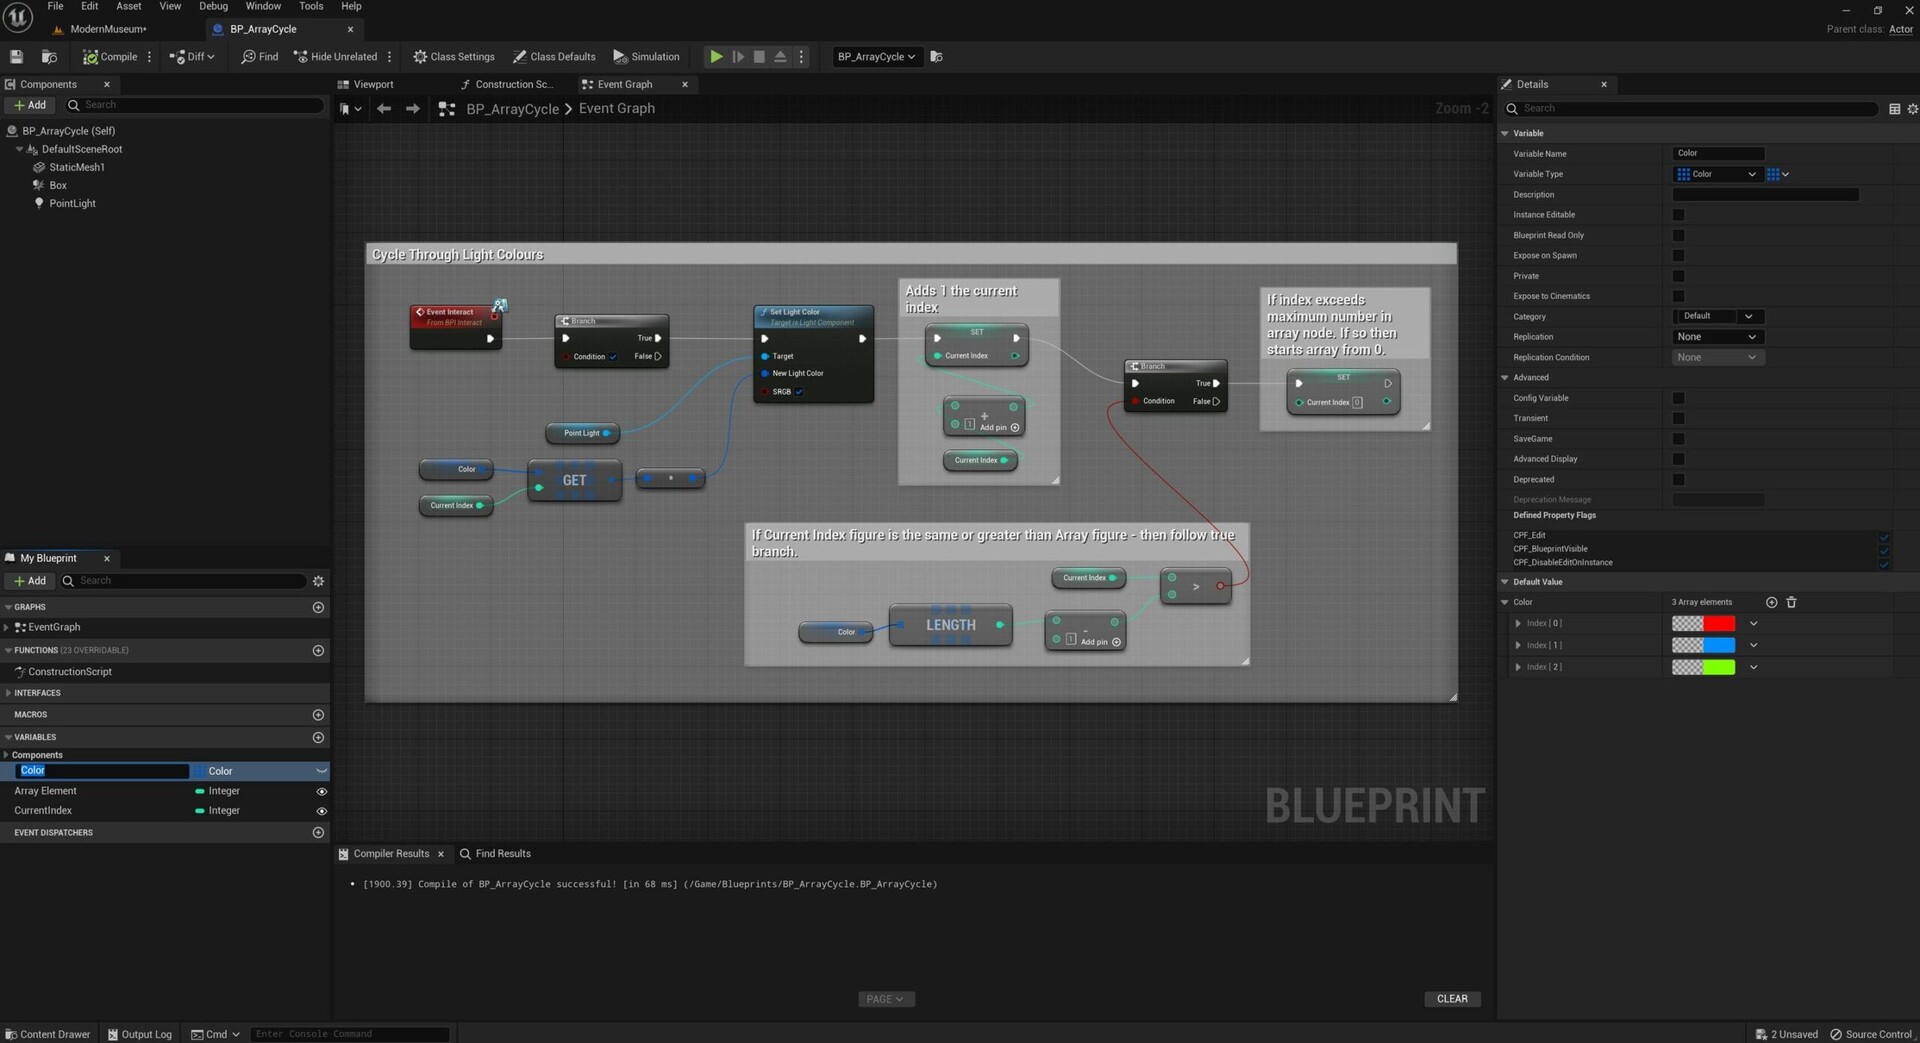
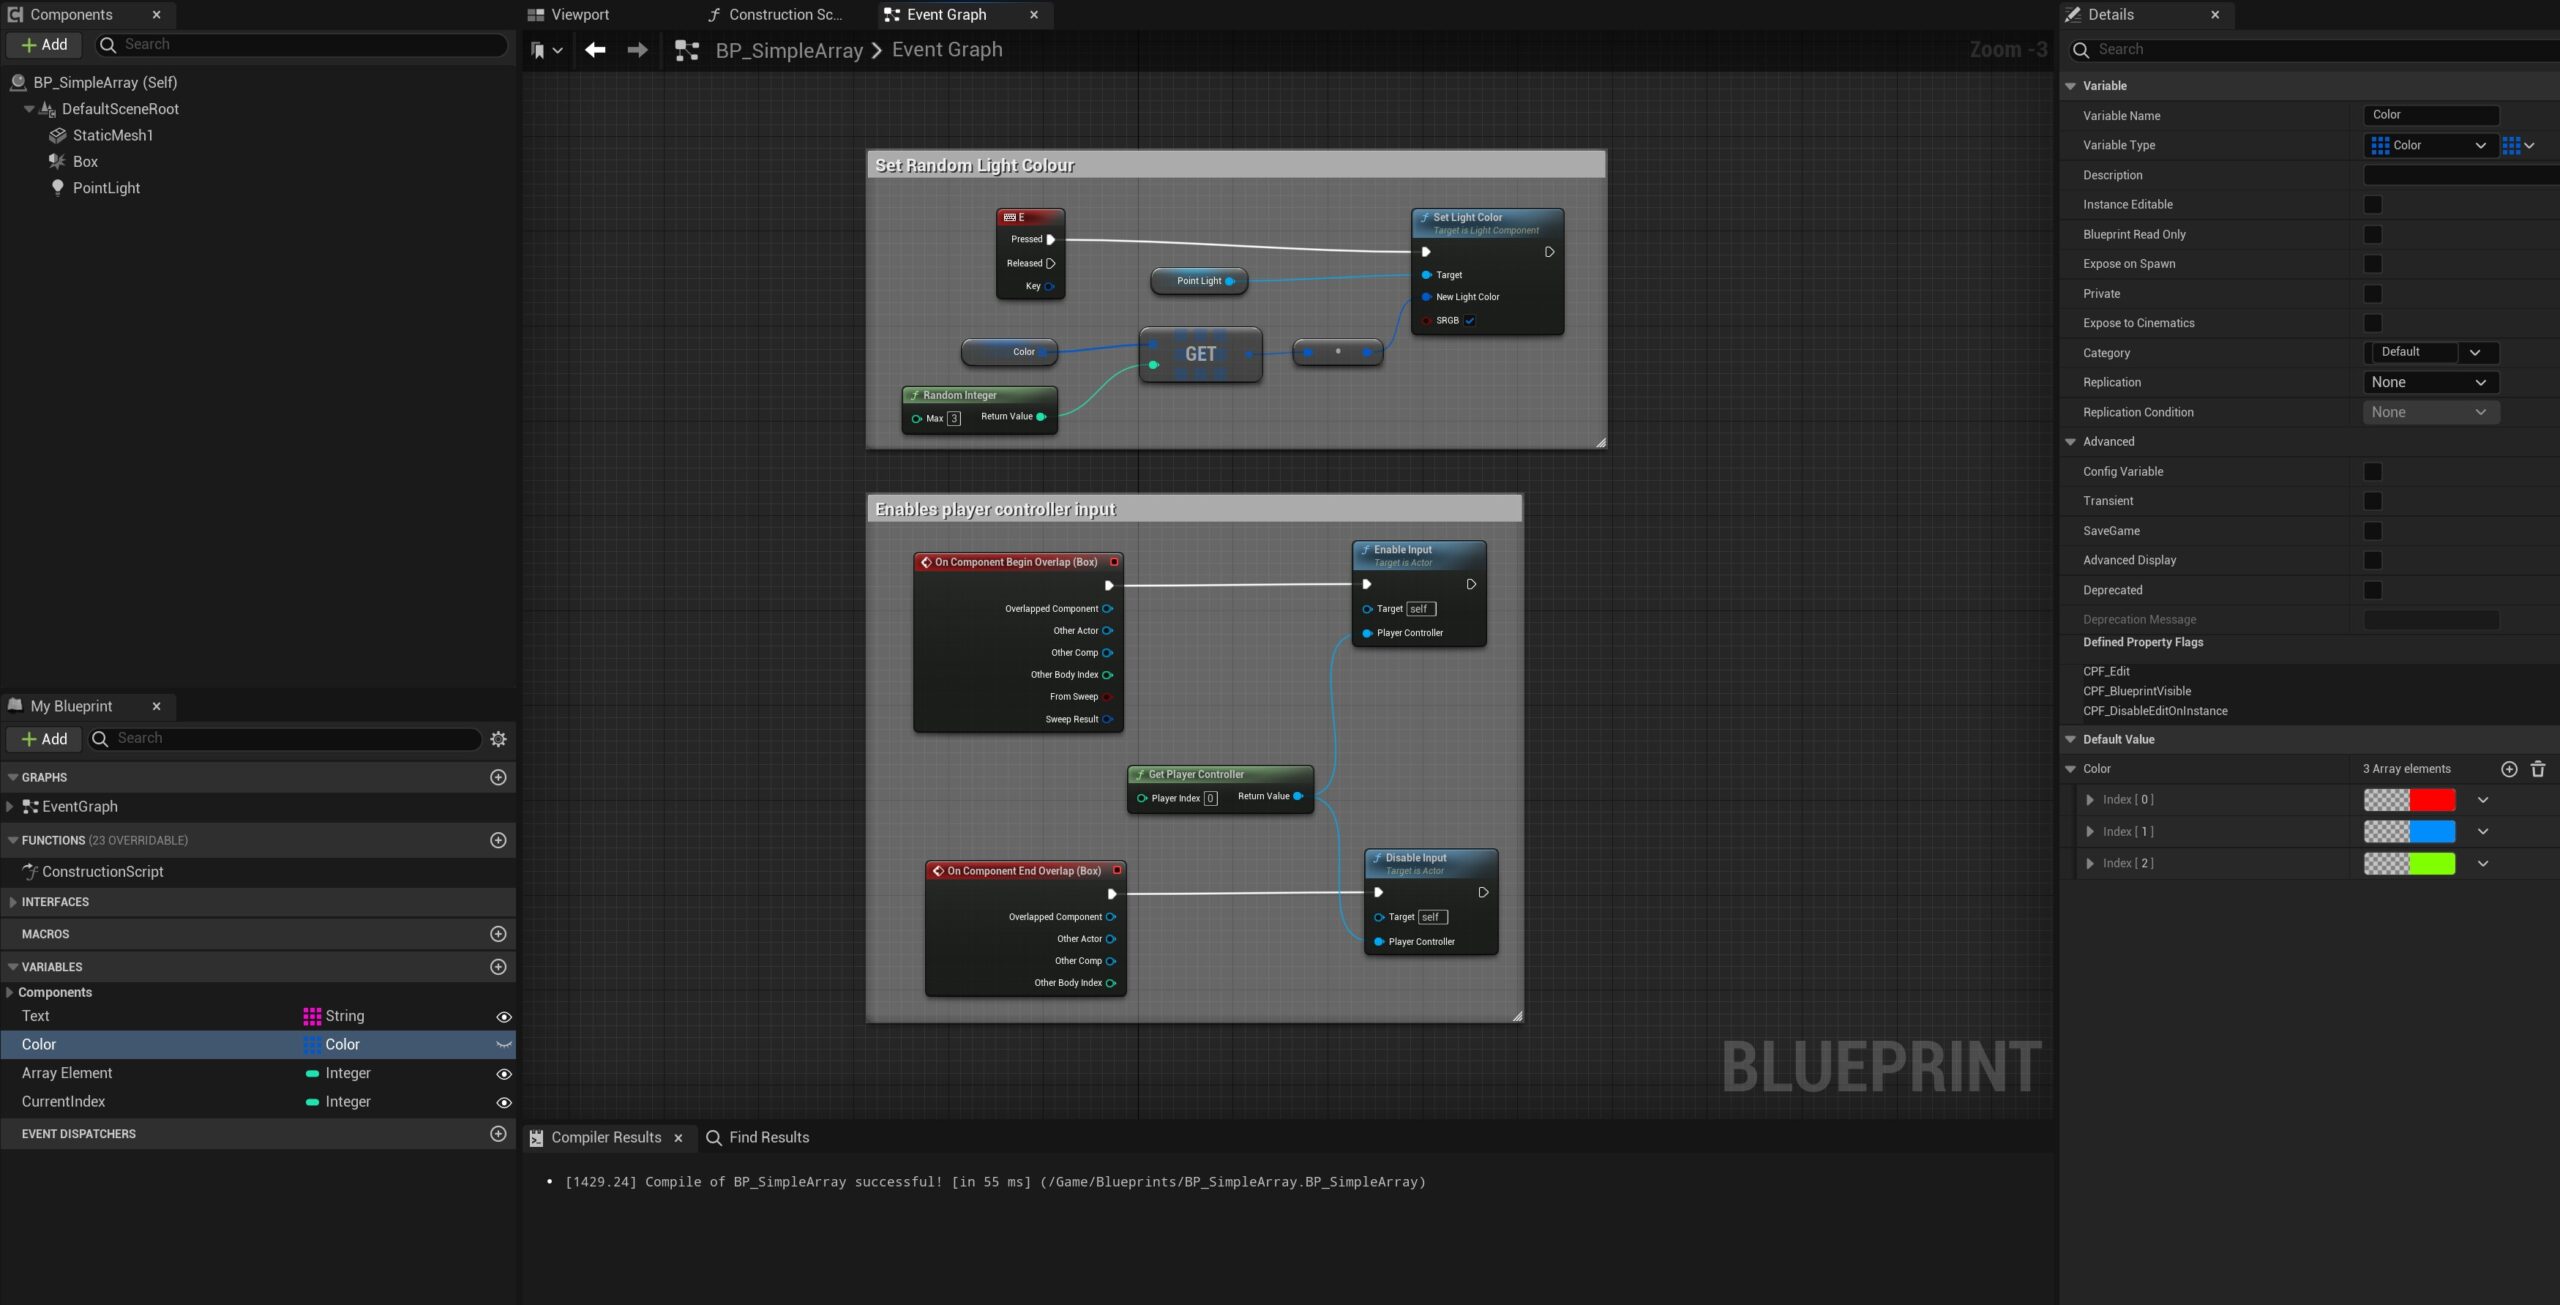
Completed Graph: Including view of variables and the array color elements.

Whilst this may look a little complicated its fairly straight forward:

  • This blueprint creates a color array of 3 colors
  • Sets the light to these colors.
  • Then adds 1 to the current index (of the array node) so the colors are cycled through.
  • Once the Index gets to 2 (Arrays start from 0 so 2 is the 3rd element) it will start again from 0.

Summary:

When your character walks up to this light and the player presses the E key the light will now change color and pressing the E key again will move to the next color in the Array.

For further blueprint tutorials please see the blueprints page by clicking here.

NOTE:

  1. I have used an interface to connect the button E to all the characters interactions.
  2. You don’t have to do this – but it is a highly recommend and more advanced approach.
  3. You can simply add the nodes below to add a key directly into the blueprint.
  4. Once the nodes below are added – then replace the Interface node key with the E key (or a key of your choosing – see more detailed instructions by clicking here).

The post Unreal Engine Blueprint – Cycle Through an Array appeared first on Motion Forge Pictures.

Report

Warn Notice Board (Free Download)

General / 15 August 2023

Warn Notice Board

Notice Board Details:

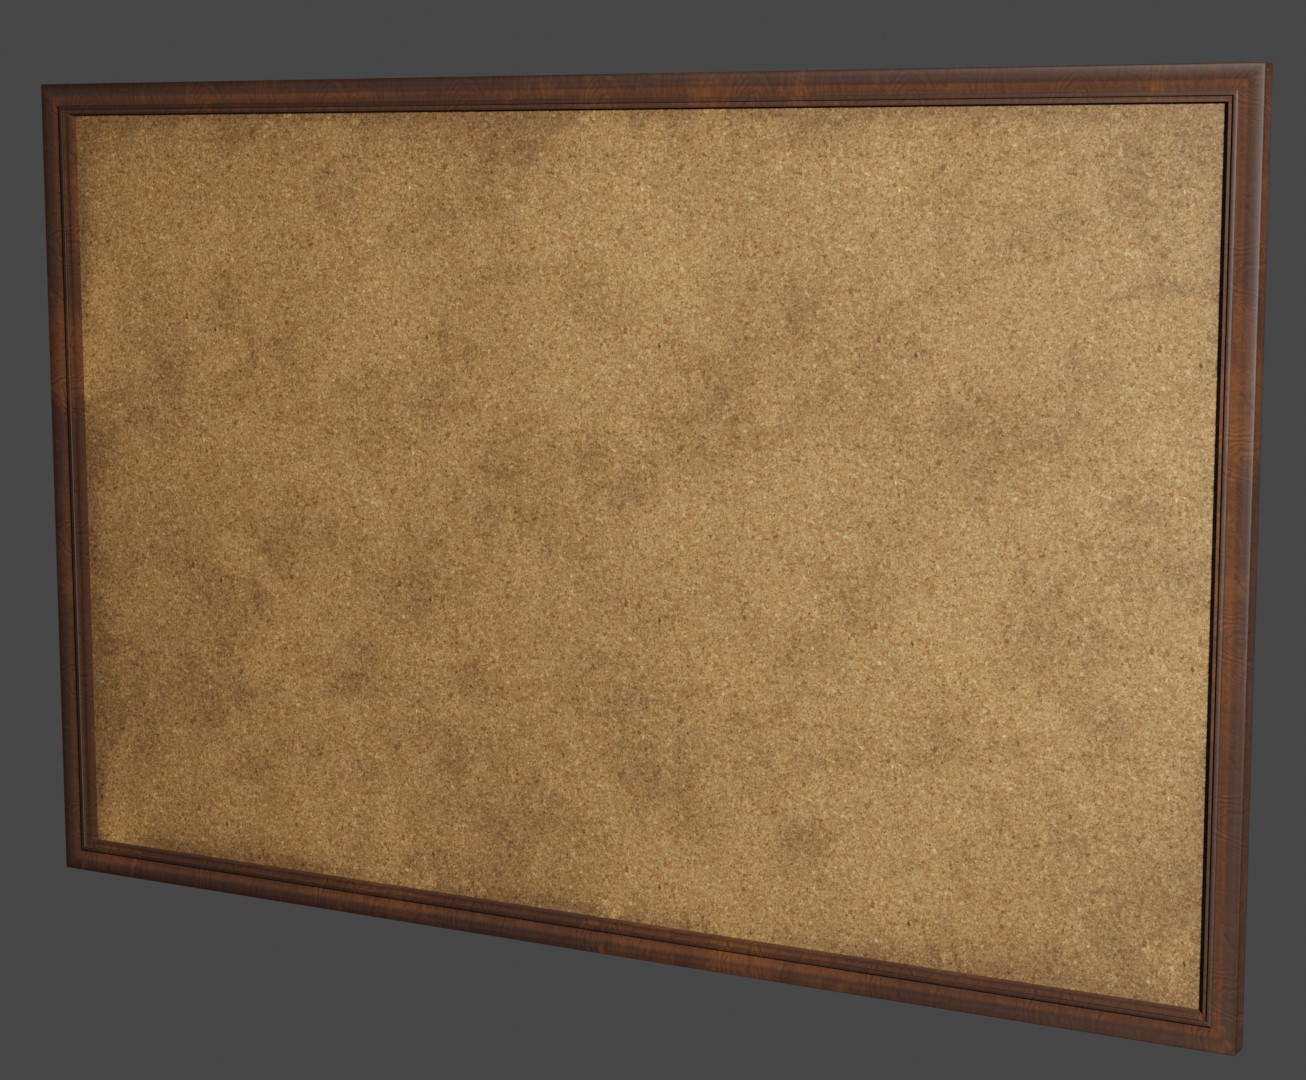
  • A warn detective style notice board has been added to the store and is free to download!
  • Low poly notice board( Vertices 144 and Faces 141).
  • Atlas wrap textures that cover entirety of the board (including wood, cork and damage).
  • FBX file type.
  • 4k – PNG – Good Quality Textures.
    • Diffuse.
    • Normal.
    • Height.
    • Rough.
  • Created in Blender and textured in Substance Painter.

Without or without the Damage Showing

The second feature image shows the notice board without damage and to achieve this look simply remove the normal texture or add the normal texture to get back the damage.

The post Warn Notice Board (Free Download) appeared first on Motion Forge Pictures.

Report

Unreal Engine – How to Create an Array Blueprint

General / 20 July 2023


Unreal Engine – Array Blueprint

Below is a simple array blueprint that you could use to create a random sequence of colours from a point light.

Simple Array Blueprint

The blueprint actor detailed in this post will allow for your character to cycle through random colors in a point light. This tutorial does require some basic understanding of blueprints to follow.


Create Blueprint Actor:

  1. Right click in a folder – Create a Blueprint and Select the ‘Actor’ Blueprint.
  2. Name accordingly.

Components:

  1. In the components section add:
    1. A point light.
    2. A static mesh (this can be a lamp or light fitting).
    3. Box Collison.
  2. Position these so they fit your requirements. Make sure your character can stand inside the trigger box.
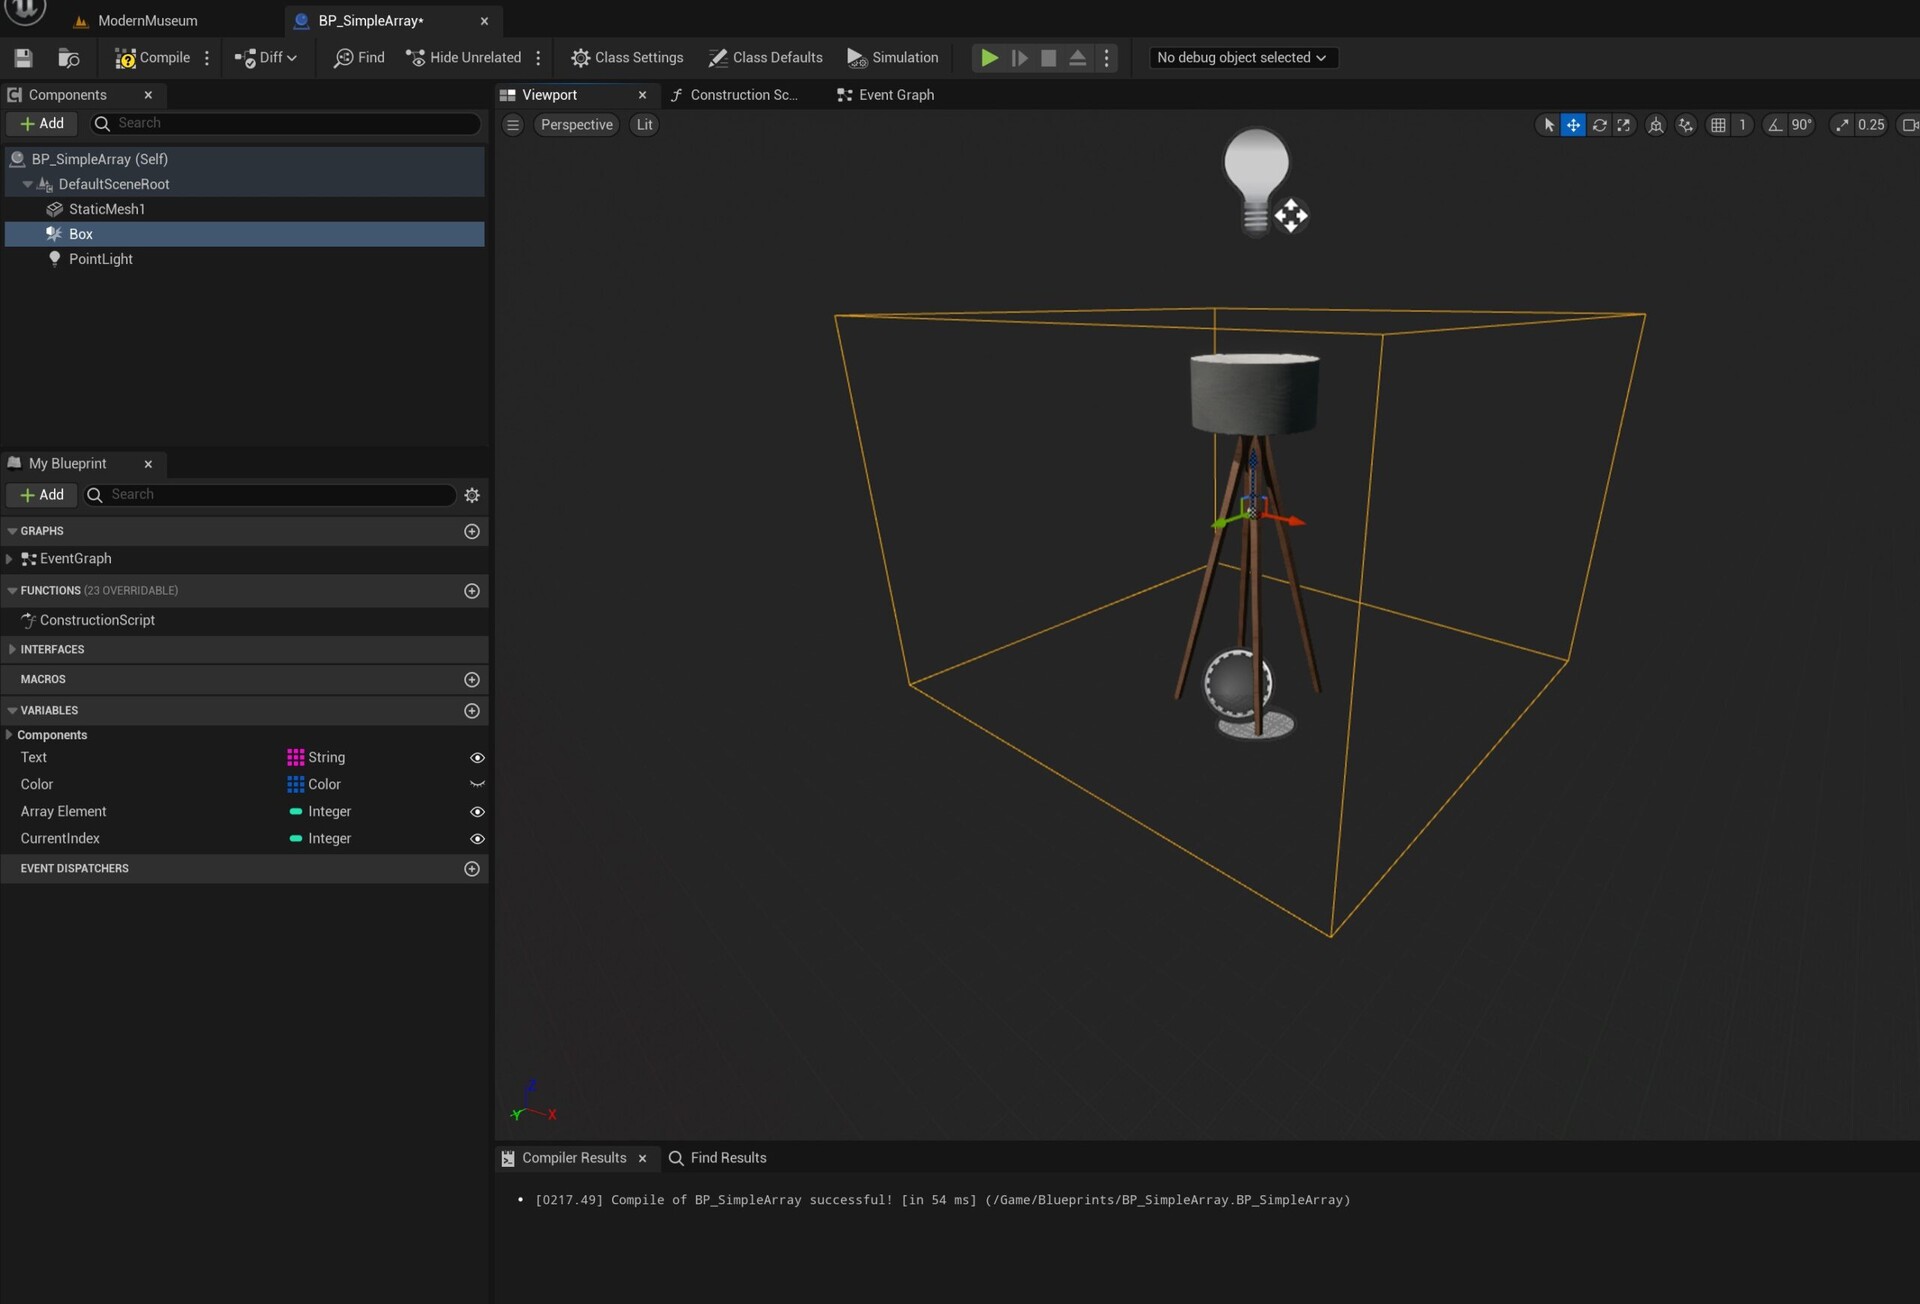
  3. See Example below.

Event Graph:

  1. In the Event Graph add the code below (Enable and Disable input and Get Player controller) to activate the player controller.
    1. To add the On Component Begin Overlap node – Right Click on the Box Collision in the components tab- Select: Add Event – On Component Begin Overlap

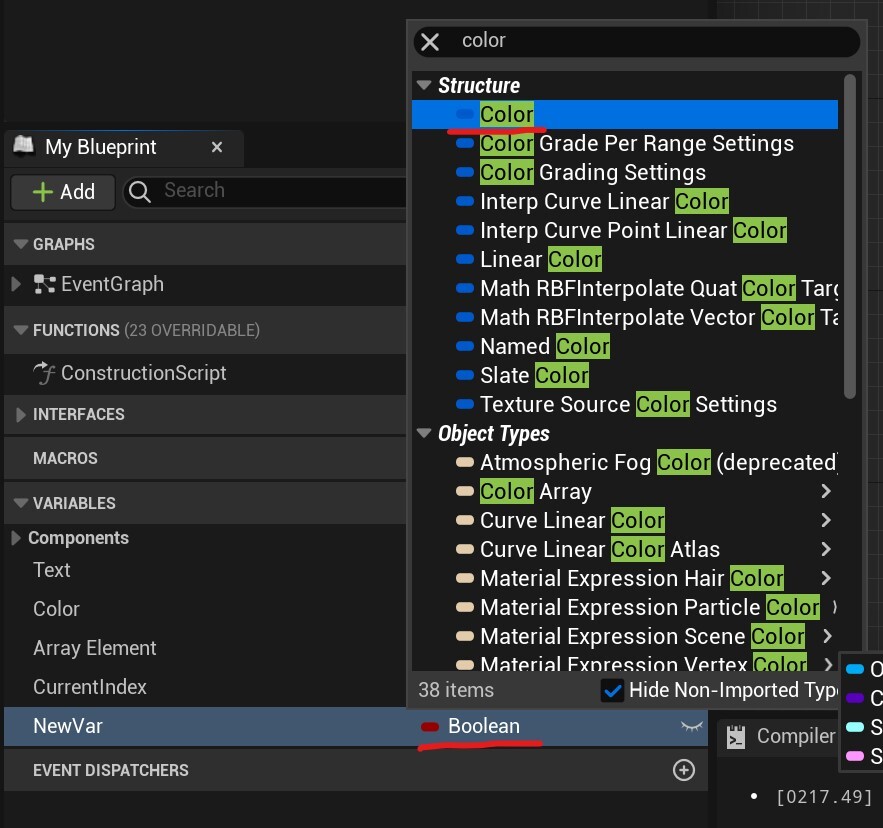
2. Add a variable – Change it from a Boolean to a Color Actor Variable (to do this click on the default bool variable that has been added and search for color).

3. Right Click once over the Color name to convert it to an Array.

3.1 Select the Color variable and in the right hand side details panel – add 3 array elements (which will only be colors).

3.2 Change these to different colors of your choice.

4. Drag in the Color array variable into the event graph.

5. Drag off from its only socket and search for ‘Get (a copy)’

6. Now right click in the graph and search for Random Integer.

6.1. Add 3 into the field of the Random Integer as we have 3 colors in our array (this could be higher if you use more than 3 colors)

7. Plug this into the ‘Get (a copy)’ node.

8. Drag in the point light from the components section – Drag off and search for ‘Set Light Color’ 

9. Plug in the ‘Get (a copy)’ node into New light Color socket.

10. Search for a keyboard key letter or number (e.g. E).

11. Plug this into the ‘Set Light Color’

12. Done! Now when the player character enters the collision box and presses E – the light color will change randomly to one of the inputted colors.

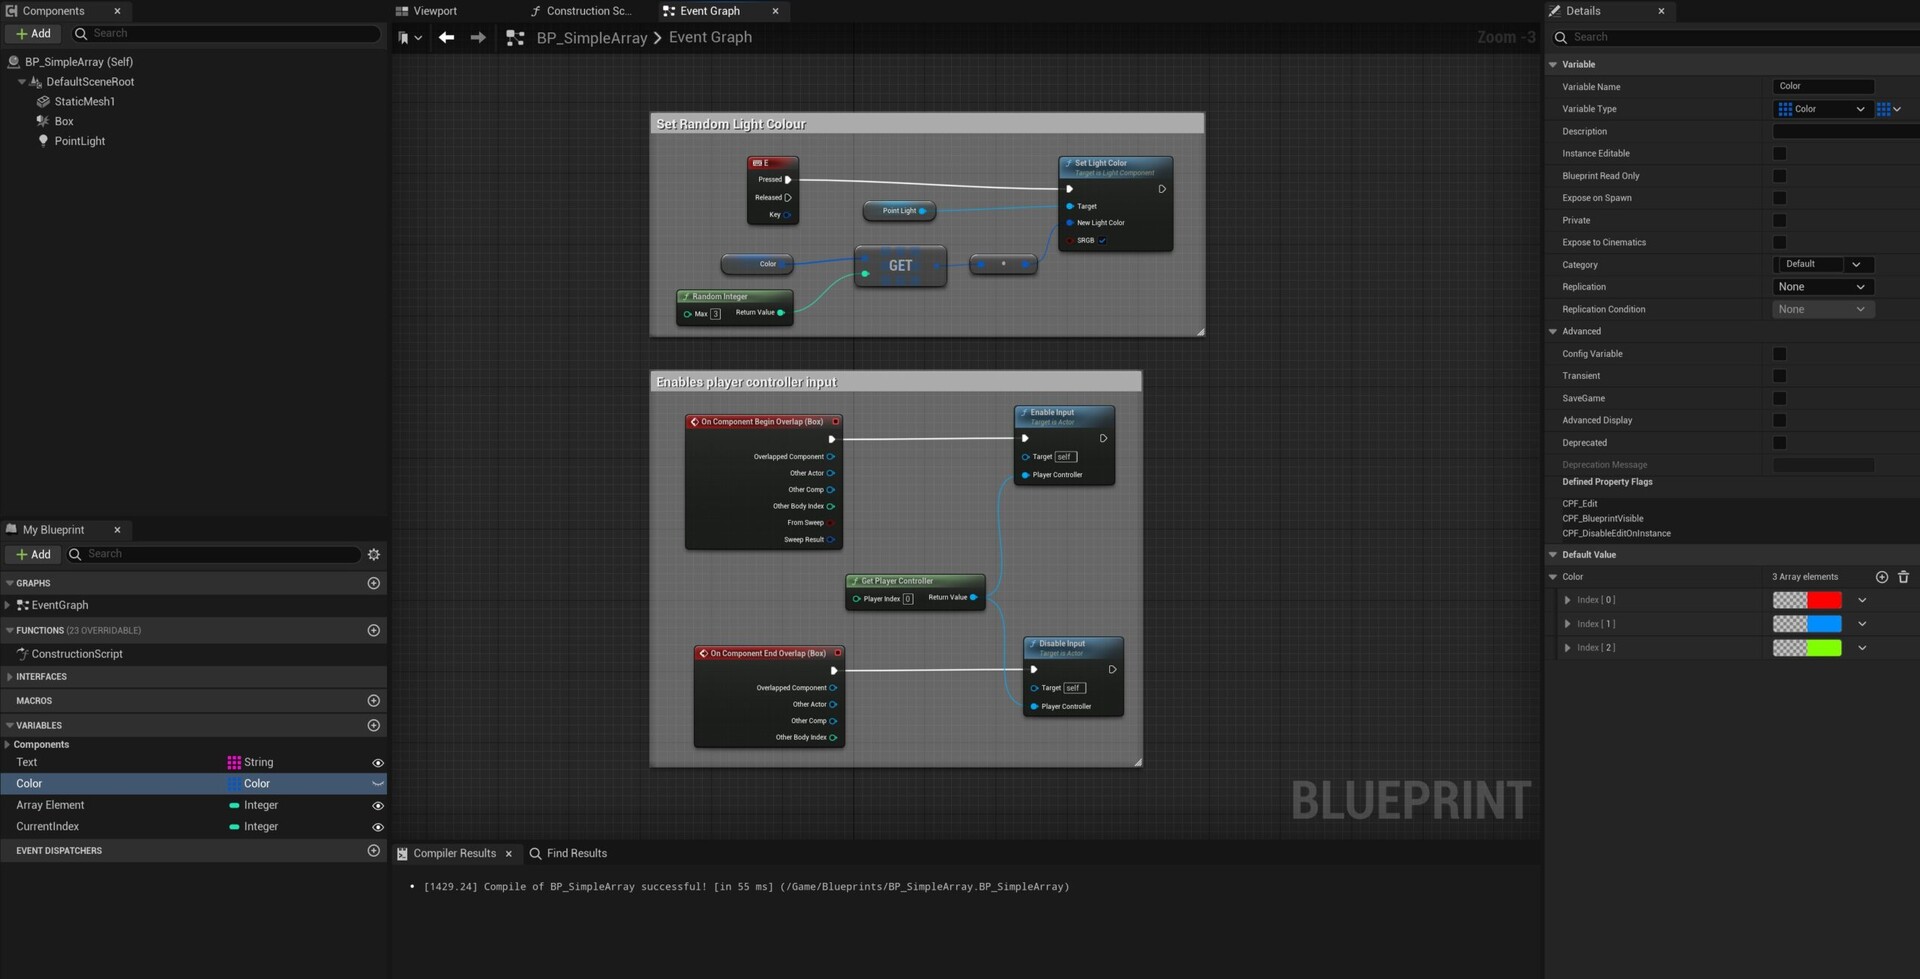
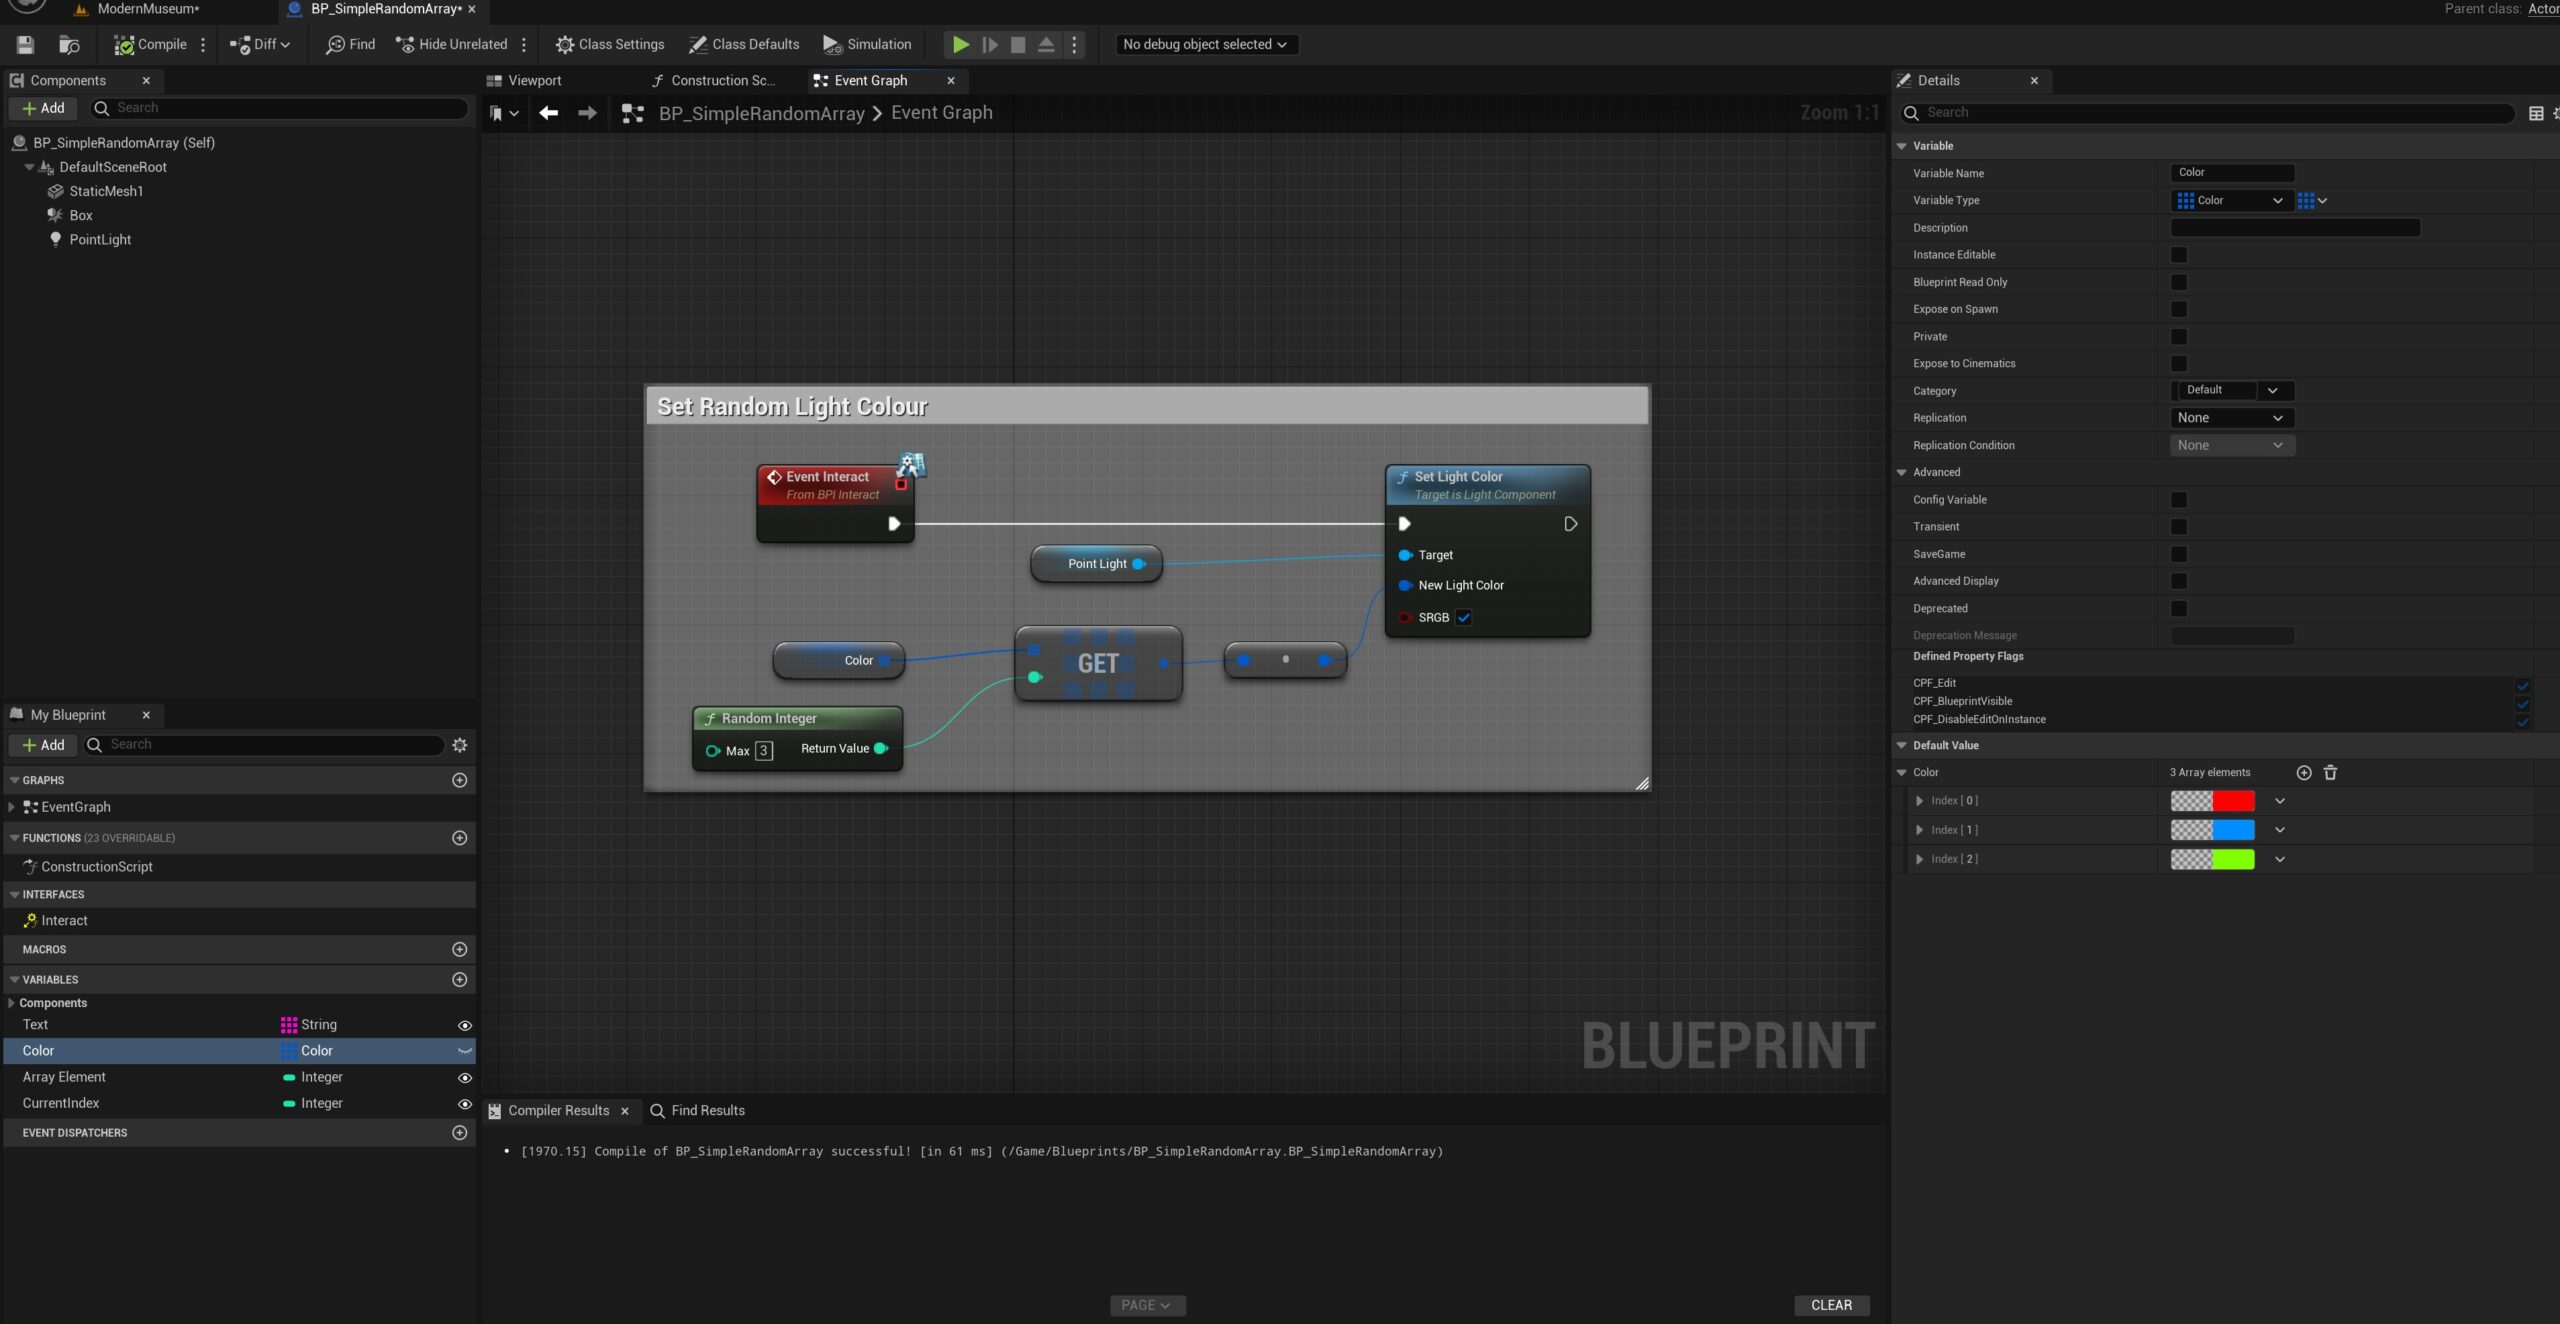
The Final Graph should look like the below:

If you have any questions please do get in touch or leave a comment. Thanks!

Pro Tip: Use an Interface that connects your character to any interact actions that take place through out the game/simulation. This has many advantages, as you will not need to keep adding the enable and disable input nodes and only need to add one interface node to your blueprint.

You also will be able to update the interface that will in turn update all blueprints using the interact interface.

For example see below the same code but with an interface used instead. I will create 2 or 3 posts on how to create and use an interface at some point in the near future. Please leave a comment if you would like to see these posts sooner.

Also please check the Blueprints page for further tutorials on Blueprints.

The post Unreal Engine – How to Create an Array Blueprint appeared first on Motion Forge Pictures.

Report

Keyboard UI Template – Free Download

General / 12 July 2023


Keyboard UI Controls Template – Free Download

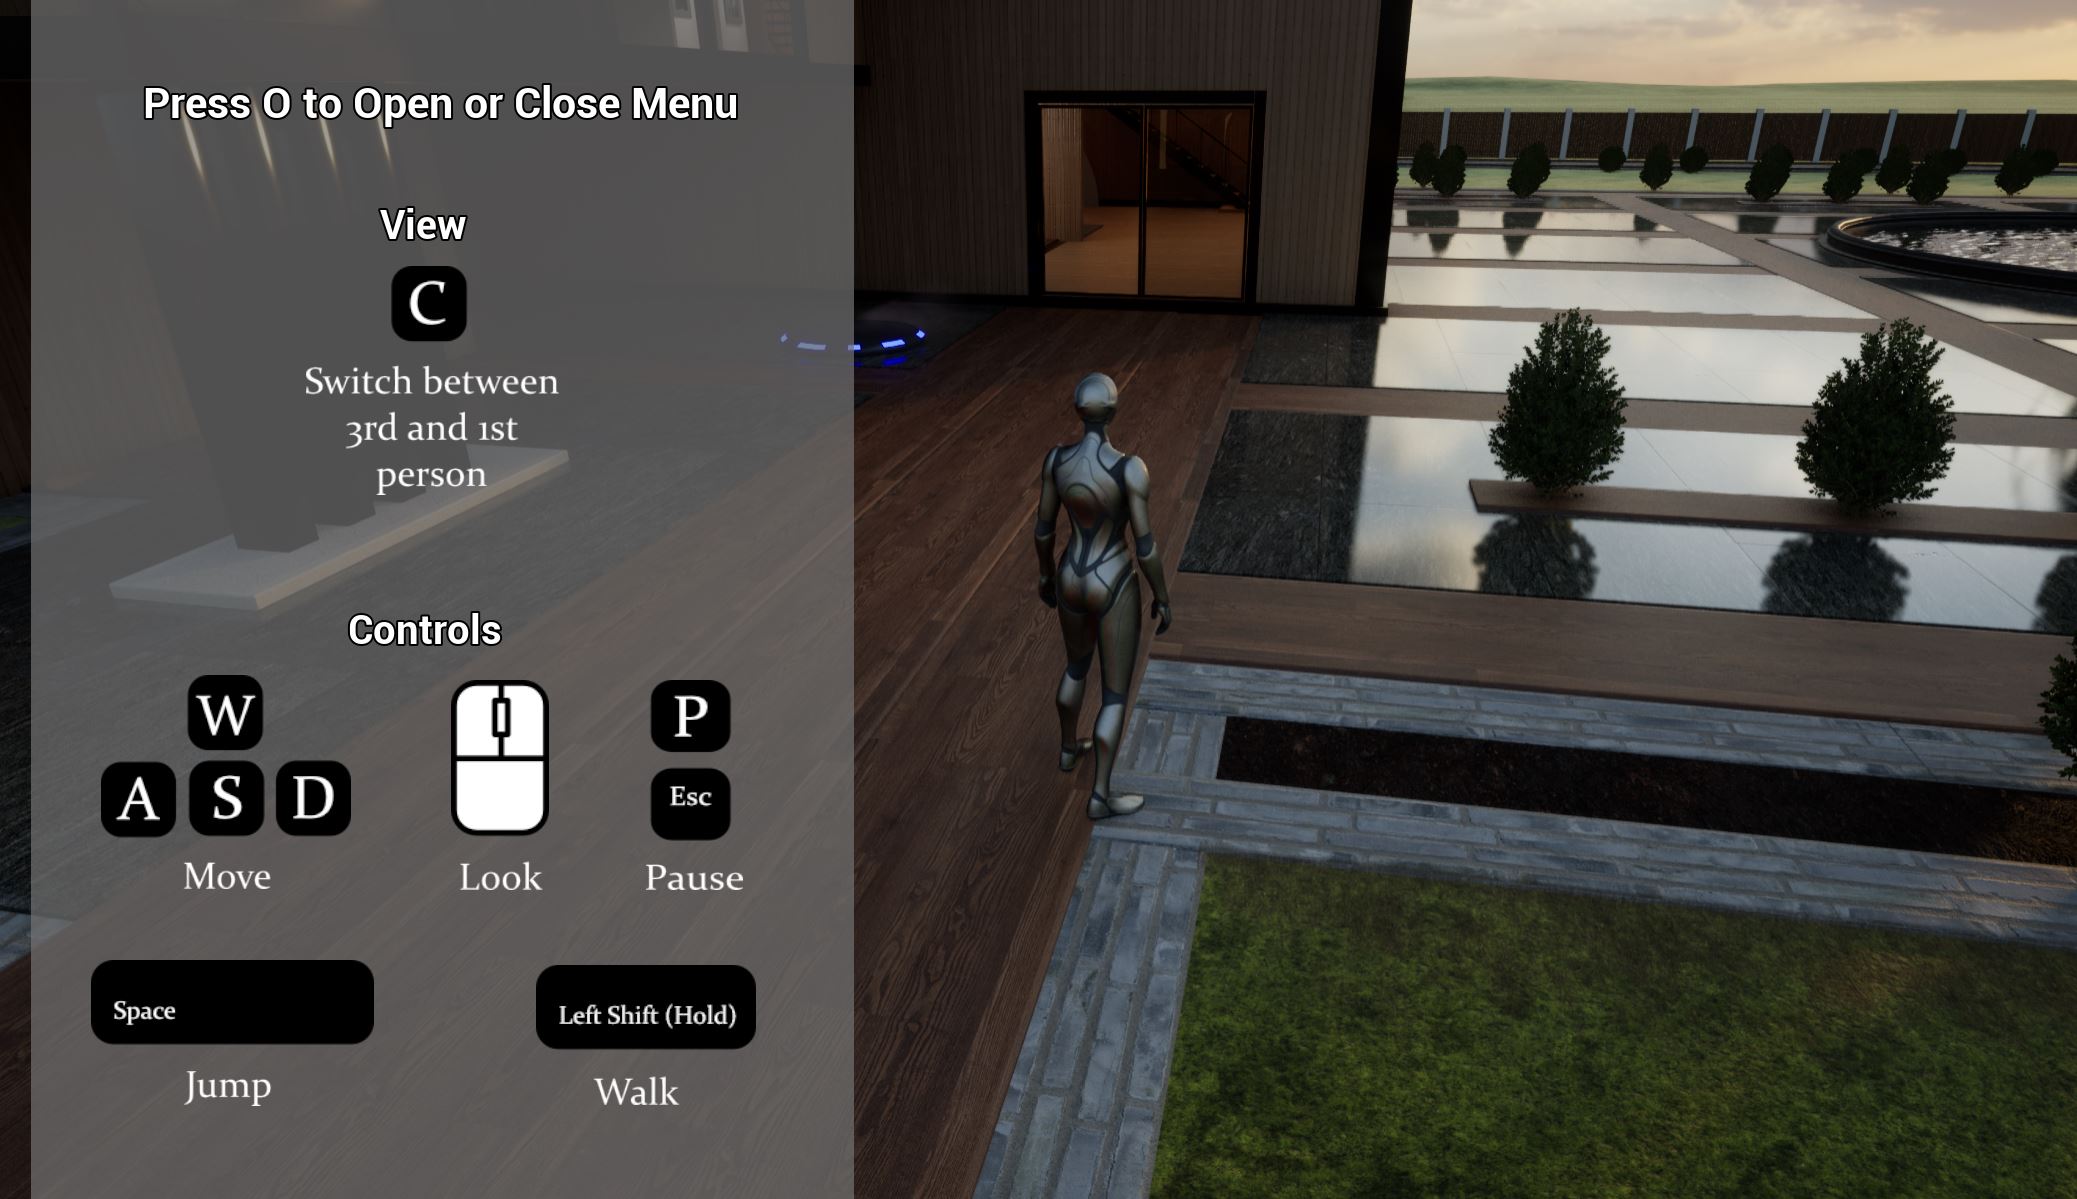
I have made some improvements to the keyboard UI template and made this latest version available for download. It contains a selection of keyboard keys and a mouse icon that can be used for any game, VR or Arch Viz Simulation. This is provided under a creative commons CC BY-SA 4.0 license.

Improvements:

  1. Tidied up and organised the layout of the layers.
  2. Transparent background by default.
  3. Added further keys and numbers.

This keyboard map provides an easy to use and easy to update template for your video game, simulation or interactive environment that requires the use of a keyboard and mouse.

It comes as both Affinity and PSD templates and only requires basic knowledge of either of these programs to update its layout and / or export out transparent PNGs.

To download see the link below:


Below is an example image of how this template can be used in a video game.

The post Keyboard UI Template – Free Download appeared first on Motion Forge Pictures.

Report